Which Option Should I Select When Installing Mysql if I Want to Upload and Query the Tables
nine.3.i Creating a Model
This tutorial describes how to create a new database model and how to forrard-engineer a model to a live MySQL server.
-
Start MySQL Workbench. On the home screen, click the models view from the sidebar and so click (+) next to Models. Alternatively, you tin can click and and then from the card (shown in the figure that follows).
Figure nine.22 Getting Started Tutorial - Home Screen

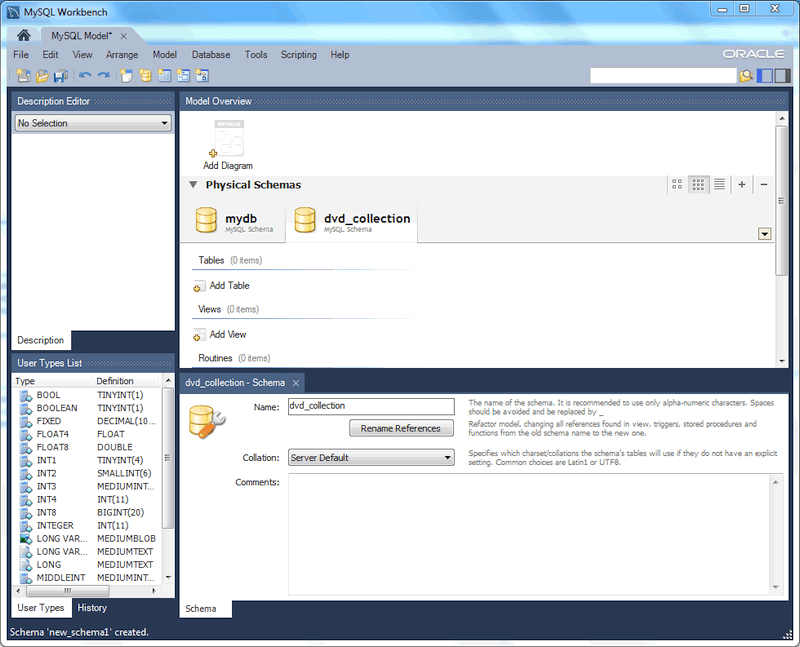
A model can comprise multiple schemas. Note that when yous create a new model, it contains the
mydbschema by default. You lot tin change the name of this default schema every bit needed or yous tin can delete it. -
Click the button on the right side of the Physical Schemas toolbar to add a new schema. The default schema proper name is
new_schema1, which you lot can at present change todvd_collectionby modifying its Name field. Confirm this change in the Physical Schemas console shown in the next figure. At present you are fix to add together a table.Figure 9.23 Getting Started Tutorial - New Schema
-
Double-click Add together Table in the Physical Schemas section.
-
This automatically loads the table editor with the default tabular array proper noun
table1. Edit the Tabular array Name field to change the tabular array name fromtable1tomovies. -
Next, add columns to your table. Double-click a Column Name prison cell and the first field defaults to
moviesidconsidering (past default) MySQL Workbench appendsidto the tabular array name for the initial field. Altermoviesidtomovie_idand keep the Datatype asINT, and also select the PK (PRIMARY Fundamental), NN (Not NULL), and AI (AUTO_INCREMENT) cheque boxes. -
Add the two additional columns described in the following tabular array. The figure that appears after the table shows all 3 columns in the
moviestable.Column Proper noun Data Blazon Column Backdrop movie_titleVARCHAR(45) NN release_dateEngagement (YYYY-MM-DD) None Figure 9.24 Getting Started Tutorial - Editing table columns

-
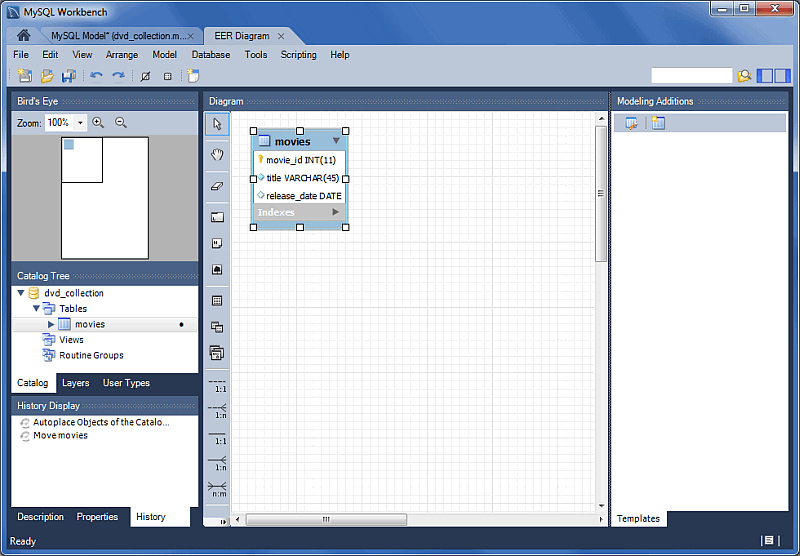
For a visual representation (EER diagram) of this schema, select and so to create the EER Diagram for the model. The adjacent figure shows the a new tab titled EER Diagram, which displays diagram representation of the movies table and columns.
Figure ix.25 Getting Started Tutorial - EER Diagram
-
In the table editor, alter the name of the column
movie_titletotitle. Note that the EER Diagram is automatically updated to reflect this change.Annotation
To open the tabular array editor, either change dorsum to the MySQL Model tab and correct-click on the
moviestable, or right-click onmoviesin the EER diagram and select an option. -
Save the model by choosing and then from the carte du jour, or click the icon on the carte toolbar. For this tutorial, type
Home_Mediaand then click .
Earlier synchronizing your new model with the live MySQL server, ostend that y'all already created a MySQL connection. This tutorial assumes you accept created a connexion already. If not, come across Section 5.ii, "Creating A New MySQL Connectedness (Tutorial)" and utilise that tutorial to create a MySQL connectedness named MyFirstConnection, although an alternative connection tin besides work.
Now frontwards-engineer your model to the live MySQL server as follows:
-
Select then from the menu to open up the Forwards Engineer to Database magician.
-
The Connection Options pace selects the MySQL connectedness and optionally sets additional options for the selected MySQL connection. Make any necessary connection changes and then click .
Note
You may decided to choose a different MySQL connection here, merely this tutorial uses MyFirstConnection.
-
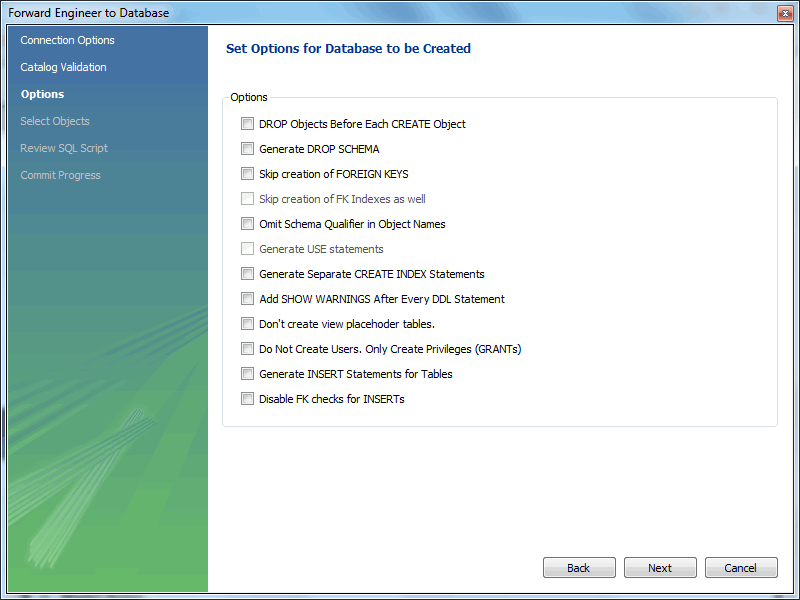
The Options footstep lists optional avant-garde options (equally shown in the figure that follows). For this tutorial, you can ignore these options and click Next.
Figure 9.26 Getting Started Tutorial - Options
-
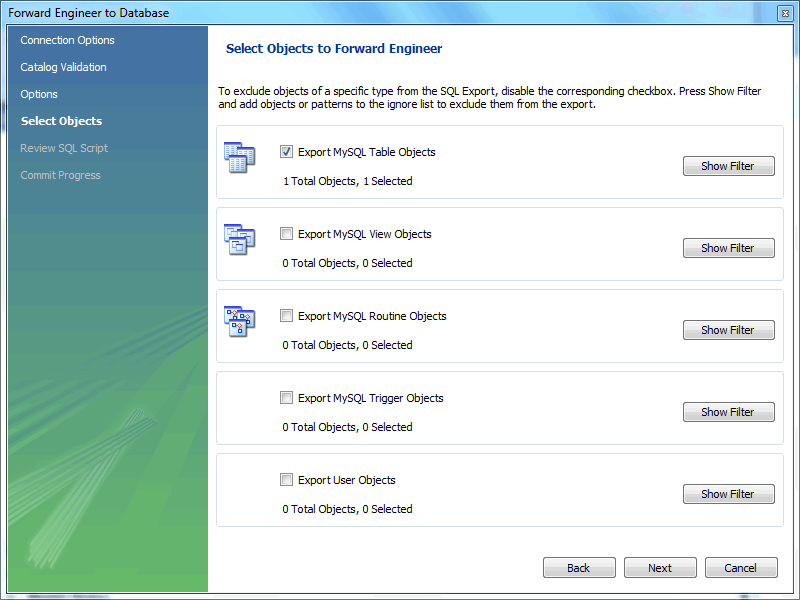
Select an object to export to the live MySQL server. In this case, there is only ane tabular array (
dvd_collection.movie). Select theConsign MySQL Table Objectscheck box (as the effigy that shows) and then click .Figure 9.27 Getting Started Tutorial - Select Objects
-
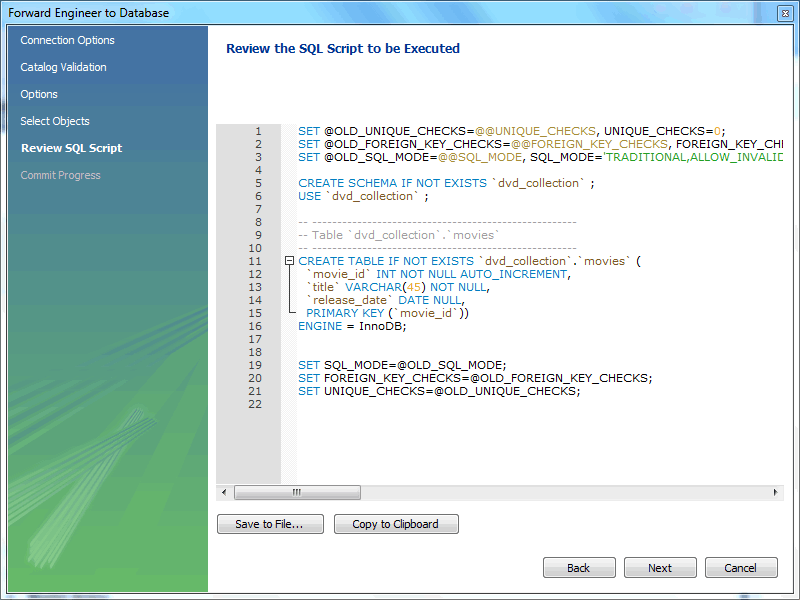
The Review SQL Script step displays the SQL script that will be executed on the live server to create your schema. Review the script to brand certain that y'all understand the operations that will exist carried out.
Click to execute the forward-engineering science procedure.
Figure 9.28 Getting Started Tutorial - Review SQL Script
-
The Commit Progress step confirms that each task was executed. Click to view the logs. If no errors are present, click to close the wizard.
-
The new
dvd_collectiondatabase is now present on the MySQL server. Confirm this by opening the MySQL connectedness and viewing the schema list, or by executingProve DATABASESfrom the MySQL Command Line Client ( mysql ). -
Click the Save Model to Current File icon on the menu toolbar to salve the model.
For additional information virtually information modeling, see Chapter ix, Database Design and Modeling.
Source: https://dev.mysql.com/doc/workbench/en/wb-getting-started-tutorial-creating-a-model.html
0 Response to "Which Option Should I Select When Installing Mysql if I Want to Upload and Query the Tables"
Post a Comment